CMCM / Setup
For a quick intro to setting up and using CMCM, check out the Getting Started Page.
Requirement:
- PHP* v.5.3 with cURL and GD2 libraries**
After downloading the latest release, simply drag the files into the directory on your server via FTP or protocol of your choice! If you downloaded cmcm with a pre-made template, the admin panel can be accessed via [your directory] /cmcm.
*PHP is only required for editing files in the backend. v5.3 is needed for Frunt PHP Sdk. If you aren't using this, you can use an earlier version of PHP5. You may design your site in whatever language of your choice. We provide Frunt, an SDK toolkit available in Javascript and PHP to provide useful utilities to access and manipulate your data.
**cURL is needed for grabbing external Media thumbnails (YT, Vimeo, Soundcloud). If you don't have it, not the end of the world, but its pretty common so you probably have it. GD2 is required for creating shrinked thumbnails. It's also pretty common, so likely your host has it.
How it Works
CMCM is database-less, JSON-based content manager. It allows you to drag and drop the files to and from any directory on your server without having to migrate any other dependencies (such as SQL/ database structures). The goal was to make a manager that is transparent, flexible, and transportable. As long as your server has PHP, it should work on any server.
First lets look at the directory structure of the cmcm folder.
- data/
- media/
- assets/
- index.php
- template.php
- config.php
- project.php
The data/ folder is where all your data files are stored. These are .json text files, that store your sites' content. You can have multiple 'backends' that can be loaded/saved/backed up within a single CMCM manager. These text files store project text based content such as title, descriptions, media information like captions. It also stores "template" data for new projects. You can learn more about templates here.
The media/ folder is where uploaded media (i.e. images, videos, sounds) are stored. The name and location of this folder can be changed in the config page of CMCM. Currently only images are uploaded to the server, but sounds and videos can be implemented via external media (Youtube, Vimeo, Soundcloud).
*Files and diretories that are greyed are internal CMCM specific resources. Only data/ and media/ are where site data is stored. If you need to update CMCM, for example, you would only replace the grey files and directories.
Data Structure
You can open up any JSON data file in your data folder (default is usually data.json) in a text editor and this is what you'll see how CMCM organizes your data..pretty readable no?
{
    //<----YOUR SITE DATA---->//
    "mediaFolder": "media/",
    "title": "My Projects",
    "subtitle": "Bob Somebody",
    "description": "These are my projects",
    "sort": {
        "by": "",
        "direction": "descending",
        "mode": "grid"
    },
    "thumb": {
        "max_width": 200,
        "max_height": 200,
        "crop": 1
    },
    "template": {
        "project": {
            //template object for new project
        },
        "media": {
            //template object for new media
        }
    },
    //<----YOUR PROJECTS--->//
    "projects": {
        //One project
         "PROJ_0": {
            "id": 0,
            "cleanUrl": "test-project",
            "published": 1,
            "added": "15 February 2014 - 06:28 pm",
            "title": "Test Project",
            "coverImage": "blahblah",
            "description": "This is a Description",
            "media": {
                //An image
                "blahblah": {
                    "src": "media/image-005.jpg",
                    "visible": 1,
                    "type": "image",
                    "caption": "This is image 1",
                    "thumb": "media/thumbnail/(5)image-005.jpg"
                }
            }
        },
        //Another project :)
        "PROJ_1": {
            "id": 1,
            "cleanUrl": "another-project",
            "published": 1,
            "added": "13 February 2014 - 07:30 pm",
            "title": "Another Project",
            "coverImage": "c3Bpcm4tMDEuanBn",
            "description": "blammo",
            "media": {
                //An image
                "c3Bpcm4tMDEuanBn": {
                    "src": "media/spirn-01.jpg",
                    "visible": "1",
                    "type": "image",
                    "caption": "",
                    "thumb": "media/thumbnail/(5)spirn-01.jpg"
                },
                //Another image
                "c3Bpcm4tMTQuanBn": {
                    "src": "media/spirn-14.jpg",
                    "visible": "1",
                    "type": "image",
                    "caption": "",
                    "thumb": "media/thumbnail/(5)spirn-14.jpg"
                }
            }
        }
    }
}
So if you are familiar with JSON or apis, having this structure should already be usable in its raw stand-alone form. With javascript or php you can read these data files and create a site like how you would make api calls.
However, we provide Frunt, a toolkit for you to get a jump-start on accessing/organizing your data...but also creating menus, previewers, modals. All our provided site templates use this tool. But of course it is optional, and can be used to the designer's liking :)
CMCM Templates
One of the most unique aspects of CMCM is the ability for you to extend the attributes of your projects and associated media. In the template section of admin panel, you can add, remove, and edit data attributes. So if you decide that all your projects need a "year" and "scale_of_project" attribute, you can simply add those attributes. Maybe you're a photographer and want to add a "film_type" attribute. For future projects, this attribute will now be added in the form. Perhaps you want all your media to have a "media_type" dropdown attribute with "drawings", "renders", and "diagrams".
The benefit is that this allows you to have real data to sort, filter, and group your projects/media. Perhaps you want to sort your homepage by "featured" or "not featured", or have your projects media sorted in groups. With flexible project/media templates, a lot is possible :)
When adding an attribute, you have options of how the information is asked for and also saved. It can be required or optional, so that when a project is added or edited, it will be validated in a certian manner.
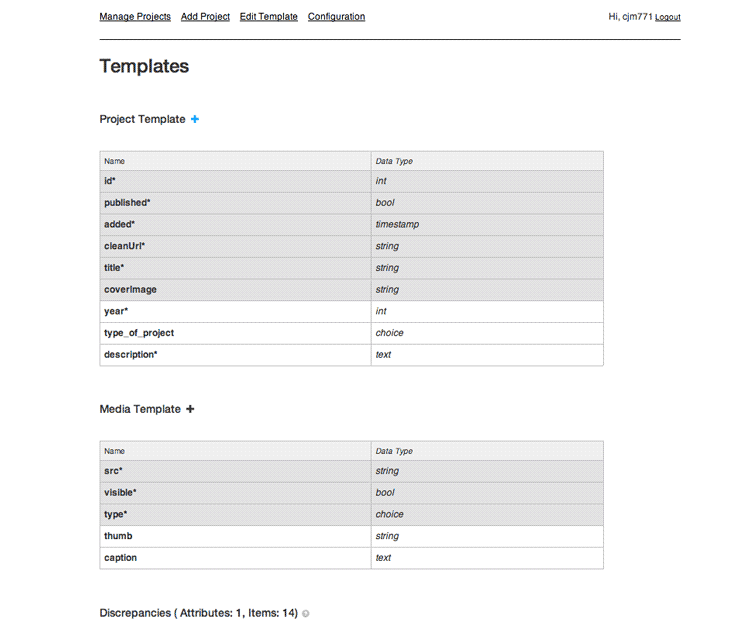
Current available attribute types:
- Bool: Value 0 or 1, Renders as checkbox
- String: String value, Renders as textbox
- Int: Integer value, Renders as textbox
- Timestamp: String value, Renders as date picker
- Text: String value, Renders as Multiline text
- Choice: String value, Renders as dropdown
"Ok so I can add new attributes. But what about my existing projects that don't have them?"
Its true, anytime you edit your templates for projects or media, this will create an inconsistency for existing projects.
Likely, this won't break anything for your frontend (unless you design it to)..but its still nice to have a clean and perfect data structure! So fortunately, CMCM will also show and allow you to resolve existing projects that are missing or have extra attributes in the templates. This is in the discrepancy section of the template page. WOoHoo.

Frunt / Setup
What is Frunt? Well once you upload your images, get your projects in CMCM just right..we still need to make a website for your visitors right? Frunt is just the front-end toolkit bundled with CMCM, specifically designed to make visualizing your data easier!
For a quick demo, check out the widget demo gallery to see the possible widgets you can create.
Hey dude, of course no worries! All of the Frunt Section is for people who customize their Front end beyond basic HTML and CSS. If that's not you, Just check out some of our premade templates here.
This toolkit is independent of the backend, and intentionally done so to appeal to a wide variety of designers. If you are super web-savvy, You can obviously work with the data structure just by bringing it in with AJAX (js) or reading the file with a server side language. But most would want a library to get,filter,group projects by certian parameters, and maybe even have some pre-made widgets to quickly generate menus or slideshows, right? That's where frunt comes in :)
Currently it is supplied for both javascript and PHP languages so you can decide how you want to grab your data and place it on the page. Chances are you will probably just use either serverside (PHP) or clientside (JS) method, but you can also use both if you like.
Frunt / JS
Below is how to initialize a frunt instance in js. Insert this into your HEAD tag or at the end of body. We ask for the cmcm root, cmcm url, and site url which is necessary for widgets and templates to have a reference. for the js SDK, we use ajax to read files, so likely the configuration file is locked. Because of this, we have to also specify what file we want to load. Additionally, we have option of loading it asynchronously (working in the background) and specifying a load callback, or loading it synchronously (async: false).
Available options and defaults (JS):
- File: String Value, Default: [File specified in main args]
- show_unpublished: Bool value,Default: false
- show_unpublished_media: Bool value, Default: false
- async: Bool value, Default: true
- load: Function (callback) value, Default: function(data){ return false; }
<!-- frunt js -->
<script src="cmcm/assets/frunt/js/frunt.js"></script>
<!-- twig js (opts, if using widgets) -->
<script src="cmcm/assets/frunt/js/lib/twig.js"></script>

<script>
/*******************
 *
 * new frunt instance!
 * args are as follows:
 *
 * CMCM_ROOT: cmcm directory, relative or abs
 * CMCM_URL: cmcm url, relative or abs
 * SITE_URL: site url, relative or abs
 * DATA FILE: filename
 * OPTS: object of additional options
 *
 *******************/

    frunt  = new frunt("cmcm/", "cmcm/", "./", "data.json", {
        async : false
    });
</script>
Frunt / PHP
Below is how to initialize a frunt instance in php. We ask for the cmcm root, cmcm url, and site url which is necessary for widgets and templates to have a reference. In php, we can read the configuration file to get the current data file loaded, but of course you can specifically load a file by specifying it in the options array.
Available options and defaults (PHP):
- File: String Value, Default: [current loaded data file]
- show_unpublished: Bool value,Default: false
- show_unpublished_media: Bool value, Default: false
- load_widget_lib: Bool value, Default: true
<?php
    // frunt php
    require_once('cmcm/assets/frunt/php/frunt.php');

    /*******************
     *
     * new frunt instance!
     * args are as follows:
     *
     * CMCM_ROOT: cmcm directory, relative or abs
     * CMCM_URL: cmcm url, relative or abs
     * SITE_URL: site url, relative or abs
     * OPTS: object of additional options
     *
     *******************/

     $frunt = new Frunt("cmcm/", "cmcm/", "./", array());
?>
WOohoo, now were ready to use frunt. The next sections are the available methods and widgets in frunt, enjoy! From now on we'll likely show code sample snippets in the currently selected SDK. So toggle between PHP and JS by clicking on your desired option in the submenu ------>
Frunt / Core
Frunt core is the basic set of methods that return your data in its raw or manipulated format. Use these to grab, group, filter your projects and media. All the following methods can be used without the need of additional dependencies, just the frunt library.
Frunt widgets are built off these methods.
Frunt / Core / Get
Below are methods for retrieving all or segmented parts of the data file.
Usage Example | PHP JS
//get all projects
$projs =  $frunt->getProjects();
//display their titles
foreach ($projs as $projID=>$proj){
    $HTML .= "<span>".$proj['title']."</span>, ";
}
echo $HTML;

///get project with id : 1
$proj =  $frunt->getProject(1);
///OR get project with by cleanUrl
$proj =  $frunt->getProject("my-awesome-project", 'cleanUrl');

//display it's title
echo $proj['title'];
//get all projects
projs =  frunt.getProjects();
//display their titles
for (i in projs){
    $("#container").append("<span>"+projs[i].title+", </span>");
}

///get project with id : 1
proj =  frunt.getProject(1);
///OR get project with by cleanUrl
proj =  frunt.getProject("my-awesome-project", 'cleanUrl');

//display it's title
$("#container").append("<span>"+proj.title+"</span>");
Frunt / Core / Group
Group is a method that takes a single set of projects or media, and then breaks it into subgroups of your desired sort attribute(s). Method will nest groups if multiple attributes are given.
Diagram if grouped by a 'year' attribute
- Project 1
- Project 2
- Project 3
- 2014
- Project 1
- 2012
- Project 2
- Project 3
Usage Example | PHP JS
//get all projects
$projs =  $frunt->getprojects();

//group by 'year'
$group = $frunt->group('year', $projs);
//OR multi-group by 'year' and then 'type_of_project'
$group = $frunt->group(array('year', 'type_of_project'), $projs);
//get all projects
projs =  frunt.getprojects();

//group by 'year'
group = frunt.group('year', projs);
//OR multi-group by 'year' and then 'type_of_project'
group = frunt.group(['year', 'type_of_project'], projs);
Frunt / Core / Filter
Filter is a method that takes a single set of projects or media, and based on rule(s) given, will remove projects that don't satisfy those rules. A full list of the rules can be seen in method doc below.
Diagram if project set is filtered by rule 'id' LESS THAN 4
- Project 1
- Project 2
- Project 3
- Project 4
- Project 5
- Project 6
- Project 1
- Project 2
- Project 3
Usage Example | PHP JS
//get all projects
$projs =  $frunt->getprojects();

//SINGLE RULE
//filter  projs where 'year' = 2014
$filteredProjs = $frunt->filter($projs, array('year', 'EQUALS', 2014));

//MULTIPLE RULES
//filter  projs with 3 rules
$filteredProjs = $frunt->filter($projs, array(
    array('year', 'EQUALS', 2014),
    array('description', 'CONTAINS', 'Architecture'),
    array('tags', 'HAS ANY TAGS', 'architecture,design')
));

//CUSTOM RULE
//grab projects that were added within last 10 days
$filteredProjs = $frunt->filter($projs, array('added', 'CUSTOM',
    function($v){
        //convert 'added' to unix numeric timestamp
        $v = $frunt->convert($v, 'timestamp');
        return (time()-(10*24*3600)<=$v) ? true : false;
    }
));
//get all projects
projs =  frunt.getprojects();

//SINGLE RULE
//filter  projs where 'year' = 2014
filteredProjs = frunt.filter(projs, ['year', 'EQUALS', 2014]);

//MULTIPLE RULES
//filter  projs with 3 rules
filteredProjs = frunt.filter(projs, [
    ['year', 'EQUALS', 2014],
    ['description', 'CONTAINS', 'Architecture'],
    ['tags', 'HAS ANY TAGS', 'architecture,design']
]);

//CUSTOM RULE
//grab projects that were added within last 10 days
filteredProjs = frunt.filter(projs, ['added', 'CUSTOM',
    function(v){
        //convert 'added' to unix numeric timestamp
        v = frunt.convert(v, 'timestamp');
        return (time()-(10*24*3600)<=v) ? true : false;
    }
]);
Frunt / Core / Convert
Convert simply takes one thing and converts it to another data type / format.
Usage Example | PHP JS
$proj = $frunt->getProject(0); //convert description to working html with \n as breaks //ex. "This is a <b>Bold </b> Description!" -------> "This is a <b>Bold </b> Description!" $proj['description'] = $frunt->convert($proj['description'], 'html,breaks'); //convert added to timestamp // ex. "15 February 2014 - 06:28 pm" ------> 1392485280 $proj['added'] = $frunt->convert($proj['added'], 'timestamp'); //convert added to formatted date // ex. "15 February 2014 - 06:28 pm" ------> "2/15/14" $proj['added'] = $frunt->convert($proj['added'], 'date', 'm/d/y');
proj = frunt.getProject(0); //convert description to working html with \n as breaks //ex. "This is a <b>Bold </b> Description!" -------> "This is a <b>Bold </b> Description!" proj.description = frunt.convert(proj.description, 'html,breaks'); //convert added to timestamp // ex. "15 February 2014 - 06:28 pm" ------> 1392485280 proj.added = frunt.convert(proj.added, 'timestamp'); //OR convert added to formatted date // ex. "15 February 2014 - 06:28 pm" ------> "2/15/14" proj.added = frunt.convert(proj.added, 'date', 'm/d/y');
Frunt / Core / Sort
Sort data in a variety of ways.
Usage Example | PHP JS
$var = array(
    'a' => 4,
    'd' => 14,
    'b' => 10,
    'c' => 5
);

//sort by VALUES
//result keys : d, b, c, a
$frunt->sort($var, 'desc');

//sort by KEYS
//result keys : d, c, b, a
$frunt->sort($var, 'desc', 1);

$var = array(
    'a' => array('type' => 'Architecture'),
    'd' => array('type' => 'Installation'),
    'b' => array('type' => 'Design'),
    'c' => array('type' => 'Photography'),
);

//sort by ATTRIBUTE
//result keys : c, d, b, a
$frunt->sort($var, 'desc', 2, 'type');

//sort by CUSTOM
//result keys : a,c,d,b
$frunt->sort($var, 'desc', 3, array('a','c','d','b'));
_var = {
    a : 4,
    d : 14,
    b : 10,
    c : 5
};

//sort by VALUES
//result keys : d, b, c, a
_new = frunt.sort(_var, 'desc');

//sort by KEYS
//result keys : d, c, b, a
_new = frunt.sort(_var, 'desc', 1);

_var = {
     a : { type : 'Architecture' },
     d : { type : 'Installation'},
     b : { type :  'Design'},
     c : { type : 'Photography'},
};

//sort by ATTRIBUTE
//result keys : c, d, b, a
_new = frunt.sort(_var, 'desc', 2, 'type');

//sort by CUSTOM
//result keys : a,c,d,b
_new = frunt.sort(_var, 'desc', 3, ['a','c','d','b']);
Frunt / Core / Twig
Twig is the Template engine that Frunt uses for it's widgets and can also be used as a means of smartly organizing your front end. Twig was chosen due to its robust features, cross-language libraries (php/js), and excellent documentation. For more information on twig check out Twig Documentation homepage.
A template engine basically allows you to seperate out the specific coding language that your using from basic HTML and CSS. That way the layouts are clear,generic, and reusable. Ex.. 'hey {{dude}}' with params dude = 'bob' will equate to 'hey bob'
Usage Example | PHP JS
//initalize a twig instance
$engine = $frunt->twig();

//assume templates/template.html contains 'hey {{name}}'

//render it! will display 'hey bob'
echo $engine->render('template.html', array(
    'name' => 'bob'
));
/********************************************
 *
 * EX 1: basic inline template
 *
 * assume templates/template.html contains 'hey {{name}}'
 *
 ********************************************/

html = frunt.twig({
    async : false,
    data : "hey {{name}}",
    params : {
        name : "bob"
    }
});
//the following will wait until above is completed.
//displays 'hey bob' in console
console.log(html);


/********************************************
 *
 * EX 2: synchronous external template
 *
 * assume templates/template.html contains 'hey {{name}}'
 *
 ********************************************/

html = frunt.twig({
    async : false,
    location : 'templates/',
    file : 'template.html',
    params : {
        name : "bob"
    }
});
//the following will wait until above is completed.
//displays 'hey bob' in console
console.log(html);


/********************************************
 *
 * EX 3: asynchronous external template
 *
 * assume templates/template.html contains 'hey {{name}}'
 *
 ********************************************/
frunt.twig({
    async : true,
    location : 'templates/',
    file : 'template.html',
    params : {
        name : "bob"
    },
    //this will be called once is done...nothing is interrupted.
    load : function(html){
        //displays 'hey bob' in console
        console.log(html);
    }
});
Frunt / Widgets
Frunt's widgets are a set of reusable components to help you build out a basic website quickly! These are basically an extension of the core set of functions, where we now implement those functions to create self-contained ready-to-use html blocks.
A widget takes care of the markup (html), the interactive (js) and initial stylings (css) of elements...examples would include menus, slideshows, previewers, scrollers, modals (enlargement windows), and more. After including a widget, you can of course add additional css to customize the look and feel of the widgets.
For a quick demo, check out the widget demo gallery to see the possible widgets you can create.
Requirements:
For frunt widget's you need to include the frunt.widgets.js and frunt.widgets.css files, regardless of the sdk. For js sdk only, you need to make sure your including the twig.js file.
So all dependencies would be the following..
- [Frunt SDK, JS or PHP]
- jquery
- twig.js*
- frunt.widgets.js
- frunt.widgets.css
<!--ADDITIONAL RESOURCES TO INCLUDE FOR WIDGETS -->

<!-- (any) jquery..if you didn't include it before -->
<script src="cmcm/assets/js/jquery-2.1.0.min.js"></script>
<!-- twig js (JS SDK ONlY..if you didn't include it before) -->
<script src="cmcm/assets/frunt/js/lib/twig.js"></script>

<!--- WIDGET SPECIFIC BELOW -->

<!-- frunt.widgets js -->
<script src="cmcm/assets/frunt/js/frunt.widgets.js"></script>
<!-- frunt.widgets css -->
<link rel='stylesheet' href='cmcm/assets/frunt/css/frunt.widgets.css' />
Frunt / Widgets / Basic
All widgets are used by calling the same widget method, just with different params. THis section will go over the widget method, and then the following specific widget sections will simply display the widget name, data type, and available options.
Usage Example | PHP JS
//grab projects
$projs = $frunt->getProjects();
//display a vertical menu, with various options..
echo $frunt->widget('menu.vertical', $projs, array(
    "collapse" => false,
    "current" => "soundcloud-test",
    "sort_by" => "year"
));
//grab projects
projs = frunt.getProjects();
//display a vertical menu, with various options..
html = frunt.widget('menu.vertical', projs, {
    async : false,
    collapse : false,
    current : "soundcloud-test",
    sort_by : "year"
});
//put it in the dom
$("#container").html(html);

//if this is after page load, make sure to reinit frunt.widgets.js
cmcm.fruntWidget.init();
Frunt / Widgets / Menus
The Menu Widget allows you to display your project lists in a variety of ways. For data input, it takes all or a subset of projects. Actual widget method structure covered here
menu.vertical
Vertical Menu (menu.vertical) accepts a set of project objects, below are the available options..
- identifier : String, Identifier type for url..cleanUrl or id / Default : 'cleanUrl'
- current : False or Int/String, Current project identifier to highlight on menu / Default : false
- url_rewrite : String, desired link url to project followed by identifier / Default : 'projects/'
- ascOrDesc : String, Sort direction / Default : 'desc'
- extras : false or Object, Additional links to append to bottom of menu ex. {about : "about.html", contact : "contact.html"} / Default : false
- extras_location : String "top" or "bottom", Location of additional links in reference to projects / Default : "bottom"
- headers : false or Array-String(2), optional headers above extras and projects..ex ['projects', 'info'] / Default : false
- sort_by : False, String or Array, Create nested subgroups in menu / Default : false
- collapse : True or False, if sort_by, collapse groups or not / Default : true
- collapse_multiple_fans : True or False,if sort_by, Allow multiple groups to be open at same time or not / Default : false
- collapse_current : False or String/int, subgroup to open on load..so if sorted by year, one could specify '2014' to show / Default : false
Usage Example | PHP JS
echo $frunt->widget("menu.vertical", $frunt->getProjects(), array(
        "sort_by" => "year",
        "current" => "soundcloud-test",
        "extras" => array(
            "about" => "about.php",
            "contact" => "contact.php"
        )
));
//display a vertical menu, with various options..
html = frunt.widget('menu.vertical', frunt.getProjects(), {
    async : false,
    sort_by : "year",
    current : "soundcloud-test",
    extras : {
        about : 'about.php',
        contact : 'contact.php'
    }
});
//put it in the dom
$("#container").html(html);

//if this is after page load, make sure to reinit frunt.widgets.js
cmcm.fruntWidget.init();
Output
menu.horizontal
Horizontal Menu (menu.horizontal) accepts a set of project objects, below are the available options..
- identifier : String, Identifier type for url..cleanUrl or id / Default : 'cleanUrl'
- current : False or Int/String, Current project identifier to highlight on menu / Default : false
- url_rewrite : String, desired link url to project followed by identifier / Default : 'projects/'
- ascOrDesc : String, Sort direction / Default : 'desc'
- extras : false or Object, Additional links to append to bottom of menu ex. {about : "about.html", contact : "contact.html"} / Default : false
- sort_by : False, String or Array, Create nested subgroups in menu / Default : false
- collapse : True or False, if true, will collapse first column into 'projects' / Default : false
Usage Example | PHP JS
//display a horizontal menu, with various options..
echo $frunt->widget("menu.horizontal", $frunt->getProjects(), array(
        "sort_by" => "year",
        "collapse" => true,
        "current" => "soundcloud-test",
        "extras" => array(
            "about" => "about.php",
            "contact" => "contact.php"
        )
));
//display a horizontal menu, with various options..
html = frunt.widget('menu.horizontal', frunt.getProjects(), {
    async : false,
    sort_by : "year",
    collapse : true,
    current : "soundcloud-test",
    extras : {
        about : 'about.php',
        contact : 'contact.php'
    }
});
//put it in the dom
$("#container").html(html);

//if this is after page load, make sure to reinit frunt.widgets.js
cmcm.fruntWidget.init();
Output
menu.grid
Grid Menu (menu.grid) accepts a set of project objects, below are the available options..
- identifier : String, Identifier type for url..cleanUrl or id / Default : 'cleanUrl'
- current : False or Int/String, Current project identifier to highlight on menu / Default : false
- url_rewrite : String, desired link url to project followed by identifier / Default : 'projects/'
- ascOrDesc : String, Sort direction / Default : 'desc'
- extras : false or Object, Additional links to append to bottom of menu ex. {about : "about.html", contact : "contact.html"} / Default : false
- sort_by : False or String, Create subgroups in menu / Default : false
- no_title : True or False, No title on thumb / Default : false
- force_cols : False or Int, Force a certian amount of thumbs in each column..makes this element responsive, and converts thumbs dimensions to percentages..make sure you use relative padding and margin if you use this feature / Default : false
Usage Example | PHP JS
//display a grid menu, with various options..
echo $frunt->widget("menu.grid", $frunt->getProjects(), array(
    "current" => "soundcloud-test"
));
//display a grid menu, with various options..
html = frunt.widget('menu.grid', frunt.getProjects(), {
    current : "soundcloud-test"
});
//put it in the dom
$("#container").html(html);

//if this is after page load, make sure to reinit frunt.widgets.js
cmcm.fruntWidget.init();
Output

artworks-000056829441-we8g5u-t500x500.jpg)
.jpg)
spirn-01.jpg)
image-005.jpg)

.jpg)

12-sandbybarn-6sRGB.jpg)

image-002 (1).jpg)
artworks-000072106204-ea8j6x-t500x500.jpg)
CMCM (1).png)


soirn-37.jpg)
drakeasaurus.jpg)
Frunt / Widgets / Preview
The Preview Widget is a quick way for you to display your media objects. For data input, it takes a media object. Most options are frunt-responsive related (fitting, ratios, relative dimensions to parent). See Responsive util doc for more info on this.
Actual widget method structure covered here
preview
Preview (preview) accepts a media object, below are the available options..
- mode : String, Preview mode... / Default : 'none'
Below are the Possible values for 'mode' option:
- none : Just show the thumb or src (if image)
- modal : On click of an overlayed icon, modal popup will show enlarged full media
- modal-noIcon : On click of thumbnail, modal popup will show enlarged full media
- thumb : [sound,video only] On clck of an overlayed icon, thumb will be replaced with external media embed
- direct_embed : [sound,video only] Directly embed external media
- modal_group : String, group to put in for modal (Enlarge, shadowbox)... / Default : 'modal'
- use_thumb : [images only] True of False, use 'thumb' or actual image... / Default : false
- autoplay : [sound,video only] True of False, play on embed / Default : false
- responsive : True or false, Toggler. See Responsive Utils for more info. / Default : true
- fit : String, 'within' or 'fill'.. Responsive option. / Default : 'fill'
- real_fit : [if mode=thumb] String, 'within' or 'fill', extra setting for embed data / Default : 'within'
- bias : False or String... Responsive option. / Default : false
- sync_parent : False or Int... Responsive option. / Default : false
- no_ratio : [sound,video only] True or false...we have [1,1] for sounds and [9,6] for videos..use this to disable those default ratios and just use parent / Default : false
CSS
You'll likely want to overwrite the dimensions of the wpr and thumb css depending on your site design. By default the stand alone preview-wpr is inline-block, and auto both width and height. In this case though, we wanted to fill width wise (100% by auto).
/* when using preview, all things are wrapped with this wpr */
/* adjust to your liking ... */
.frunt-preview-wpr{
	display: inline-block;
	width: 100%;
	height: 100%;
}
/* actual media..img or iframe generally..*/
/*dimensions overridden if responsive : true */
/* adjust to your liking ... */
.frunt-preview-wpr .frunt-preview-thumb{
	display : block;
	width: 100%;
	height: auto;
}
Usage Example #1: Image Modal | PHP JS
//grab project with id : 0
$proj = $frunt->getProject(0);

//display first media object which is an image
echo $frunt->widget("preview", $frunt->getItem($proj['media'], 0), array(
    "mode" => "modal",
    //following used because our height is not defined so ignore parent height as a constraint
    "bias" => "parent-width",
    "modal_group" => "preview widget example"
));
//grab project with id : 0
proj = frunt.getProject(0);

//display first media object which is an image
html =  frunt.widget("preview", frunt.getItem(proj.media, 0), {
    async : false,
    mode : "modal",
    //following used because our height isn't defined so ignore it as a constraint
    bias : "parent-width",
    modal_group : "preview widget example"
});
//put it in the dom
$("#container").html(html);

//if this is after page load, make sure to reinit frunt.widgets.js
cmcm.fruntWidget.init();
Output
Usage Example #2: Video Thumb | PHP JS
//grab a project
$proj = $frunt->getProject("soundcloud-test", "cleanUrl");

//display a media object which is a video
echo $frunt->widget("preview", $frunt->getItem($proj['media'], 3), array(
    "mode" => "thumb",
    //following used because our height is not defined so ignore parent height as a constraint
    "bias" => "parent-width",
    "autoplay" => true
));
//grab a project
proj = frunt.getProject("soundcloud-test", "cleanUrl");

//display a media object which is an image
html =  frunt.widget("preview", frunt.getItem(proj.media, 3), {
    async : false,
    mode : "thumb",
    //following used because our height isn't defined so ignore it as a constraint
    bias : "parent-width",
    autoplay : true
});
//put it in the dom
$("#container").html(html);

//if this is after page load, make sure to reinit frunt.widgets.js
cmcm.fruntWidget.init();
Output
Frunt / Widgets / Layouts
The Layout Widgets is a quick way for you to display multiple media items in a scroller,slideshow, or grid. For data input, it takes a set of media objects.
Actual widget method structure covered here
Events / Methods
For any layout that has controls (next/prev/etc), you can optionally create custom controls by using the following event ,frunt.slider.change, and method, slideshow_goto in javascript.
//slide change event
$("#myContainer .frunt-layout").on("frunt.slider.change", function(e){
    console.log("slide changed! "+e.index+"!")
});

//goto slide function
index = 3;
cmcm.fruntWidget.slideshow_goto("#myContainer .frunt-layout", index);
layout.horizontal
Horizontal layout (layout.horizontal) accepts a set of media objects, below are the available options..
- slide_controls : false or String, Slide controls display mode...options are 'numbers', 'dots', 'thumbs' / Default : false
- document_scroll : true or false, If slide controls should track document scroll or actual frunt-slider scroll. / Default : false
-
media_opts : Set of Objects, options for each media type.. / Default : {image : media opts, sound : media opts, video : media opts}
Each media type can have seperate options.
- image : See Preview widget options.
- sound : See Preview widget options.
- video : See Preview widget options.
- no_caption : True or false, turn on or off caption display. / Default : false
CSS Defaults
These are the default dimensions of the slider wrapper and individual slide. Depending on your design, you'll likely want to override one or both of these. In our example, we actually use the responsive option of sync-parent, so the slide dimensions get synced up to the media..the wrapper we leave as is (auto x 450px)
//Scroller wrapper defaults..
//adjust dimensions to your liking
.frunt-layout-horizontal  .frunt-slider{
    width : auto;
    height: 450px;

}

//Individual slide defaults..
//adjust dimensions to your liking
.frunt-layout-horizontal .slide{
    width: 100%;
    height: 100%;
}
Usage | PHP JS
//grab project
$proj =$frunt->getProject("soundcloud-test", "cleanUrl");

//display  media objects
echo $frunt->widget("layout.horizontal", $proj['media'], array(
    "slide_controls" => "numbers",
    //we use thumb mode for sound and video, and modal mode for images
    "media_opts" => array(
        "sound" => array(
            "mode" => "thumb",
            "modal_group" => "horizontal scroll",
             //take parent-height, ignore parent-width
            "bias" => "parent-height",
             //sync media dimensions to two parents up (img > wpr > slide)
            "sync_parent" => 2
        ),
        "video" => array(
            "mode" => "thumb",
            "modal_group" => "horizontal scroll",
            "bias" => "parent-height",
            "sync_parent" => 2
        ),
        "image" => array(
            "mode" => "modal",
            "modal_group" => "horizontal scroll",
            "bias" => "parent-height",
            "sync_parent" => 2

        )
    )
));
//grab project
proj = frunt.getProject("soundcloud-test", "cleanUrl");

//display  media objects
html = frunt.widget("layout.horizontal", proj['media'], {
    slide_controls : "numbers",
    //we use thumb mode for sound and video, and modal mode for images
    media_opts : {
        sound : {
            mode : "thumb",
            modal_group : "horizontal scroll",
             //take parent-height, ignore parent-width
            bias : "parent-height",
             //sync media dimensions to two parents up (media > wpr > slide)
            sync_parent : 2
        },
        video : {
            mode : "thumb",
            modal_group : "horizontal scroll",
            bias : "parent-height",
            sync_parent : 2
        },
        image : {
            mode : "modal",
            modal_group : "horizontal scroll",
            bias : "parent-height",
            sync_parent : 2

        }
    }
});

//put it in the dom
$("#container").html(html);

//if this is after page load, make sure to reinit frunt.widgets.js
cmcm.fruntWidget.init();
Output
.jpg)
.jpg)
layout.vertical
Vertical layout (layout.vertical) accepts a set of media objects, below are the available options..
- slide_controls : false or String, Slide controls display mode...options are 'numbers', 'dots', 'thumbs' / Default : false
- document_scroll : true or false, If slide controls should track document scroll or actual frunt-slider scroll. / Default : false
-
media_opts : Set of Objects, options for each media type.. / Default : {image : media opts, sound : media opts, video : media opts}
Each media type can have seperate options.
- image : See Preview widget options.
- sound : See Preview widget options.
- video : See Preview widget options.
- no_caption : True or false, turn on or off caption display. / Default : false
CSS Defaults
These are the default dimensions of the slider wrapper and individual slide. Depending on your design, you'll likely want to override one or both of these. In our example, we actually use the responsive option of sync-parent, so the slide dimensions get synced up to the media..the wrapper we leave as is (auto x 450px)
//Scroller wrapper defaults..
//adjust dimensions to your liking
 .frunt-layout-vertical  .frunt-slider{
     width: auto;
     height: 450px;
}

//Individual slide defaults..
//adjust dimensions to your liking
.frunt-layout-vertical .slide{
    width: 100%;
    height: 100%;
}
Usage | PHP JS
//grab project
$proj =$frunt->getProject("soundcloud-test", "cleanUrl");

//display  media objects
echo $frunt->widget("layout.vertical", $proj['media'], array(
        "slide_controls" => "thumbs",
        "media_opts" => array(
            "sound" => array(
                "mode" => "thumb",
                "modal_group" => "vertical scroll",
                 //take parent-width, ignore parent-height
                "bias" => "parent-width",
                 //sync media two parents up (media > wpr > slide)
                "sync_parent" => 2
            ),
            "video" => array(
                "mode" => "thumb",
                "modal_group" => "vertical scroll",
                "bias" => "parent-width",
                "sync_parent" => 2
            ),
            "image" => array(
                "mode" => "modal-noIcon",
                "modal_group" => "vertical scroll",
                "bias" => "parent-width",
                "sync_parent" => 2

            )
        )
));
//grab project
proj = frunt.getProject("soundcloud-test", "cleanUrl");

//display  media objects
html = frunt.widget("layout.vertical", proj['media'], {
    slide_controls : "thumbs",
    //we use thumb mode for sound and video, and modal mode for images
    media_opts : {
        sound : {
            mode : "thumb",
            modal_group : "vertical scroll",
             //take parent-width, ignore parent-height
            bias : "parent-width",
             //sync media two parents up (media > wpr > slide)
            sync_parent : 2
        },
        video : {
            mode : "thumb",
            modal_group : "verrtical scroll",
            bias : "parent-width",
            sync_parent : 2
        },
        image : {
            mode : "modal-noIcon",
            modal_group : "vertical scroll",
            bias : "parent-width",
            sync_parent : 2

        }
    }
});

//put it in the dom
$("#container").html(html);

//if this is after page load, make sure to reinit frunt.widgets.js
cmcm.fruntWidget.init();
Output
layout.slideshow
Slideshow layout (layout.slideshow) accepts a set of media objects, below are the available options..
- autoplay : false or Int ,Number in milliseconds for delay ex. 5000 = 5 seconds / Default : false
- transition_effect : String, "slide" or "fade" transition effect / Default : "slide"
- transition_length : int, length of transition / Default : 400
- next_on_click : true or false, clicking on slide goes next or previous / Default : true
- loop_slides : true or false, if should return to beginning after last slide / Default : true
- slide_controls : false or String, Slide controls display mode...options are 'numbers', 'dots', 'thumbs' / Default : false
-
media_opts : Set of Objects, options for each media type.. / Default : {image : media opts, sound : media opts, video : media opts}
Each media type can have seperate options.
- image : See Preview widget options.
- sound : See Preview widget options.
- video : See Preview widget options.
- no_caption : True or false, turn on or off caption display. / Default : false
CSS Defaults
These are the default dimensions of the slider wrapper and individual slide. Depending on your design, you'll likely want to override one or both of these. In this example, the slider wrapper we leave as is (auto x 450px)
//Scroller wrapper defaults..
//adjust dimensions to your liking
 .frunt-layout-slideshow  .frunt-slider{
     width: auto;
     height: 450px;
}

//Individual slide defaults..
//adjust dimensions to your liking
.frunt-layout-slideshow .slide{
    width: 100%;
    height: 100%;
}
Usage | PHP JS
//grab project
$proj =$frunt->getProject("soundcloud-test", "cleanUrl");

//display  media objects
echo $frunt->widget("layout.slideshow", $proj['media'], array(
    "autoplay" => 5000,
    "transition_effect" => "fade",
    "slide_controls" => "dots",
    "media_opts" => array(
        "sound" => array(
            "mode" => "thumb",
            "modal_group" => "ss"

        ),
        "video" => array(
            "mode" => "thumb",
            "modal_group" => "ss"
        ),
        "image" => array(
            "mode" => "modal",
            "modal_group" => "ss"

        )
    )
));
//grab project
proj = frunt.getProject("soundcloud-test", "cleanUrl");

//display  media objects
html = frunt.widget("layout.slideshow", proj['media'], {
    autoplay : 5000,
    transition_effect : "fade",
    slide_controls : "dots",
    media_opts : {
        sound : {
            mode : "thumb",
            modal_group : "ss"
        },
        video : {
            mode : "thumb",
            modal_group : "ss"
        },
        image : {
            mode : "modal",
            modal_group : "ss"

        }
    }
});

//put it in the dom
$("#container").html(html);

//if this is after page load, make sure to reinit frunt.widgets.js
cmcm.fruntWidget.init();
Output
layout.grid
Grid layout (layout.grid) accepts a set of media objects, below are the available options..
- sort_by : false or String, Attribute to create subgroups with / Default : false
- force_cols : False or Int, Force a certian amount of thumbs in each column..makes this element responsive, and converts thumbs dimensions to percentages..make sure you use relative padding and margin if you use this feature / Default : false
- ascOrDesc : String, Sort direction / Default : 'desc'
-
media_opts : Set of Objects, options for each media type.. / Default : {image : media opts, sound : media opts, video : media opts}
Each media type can have seperate options.
- image : See Preview widget options.
- sound : See Preview widget options.
- video : See Preview widget options.
- no_caption : True or false, turn on or off caption display. / Default : false
CSS Defaults
Editing the thumbnail size happens in CSS. Below are defaults, override to your liking. Check out frunt.widgets.css for more css options to override.
.frunt-layout-grid .thumb_wpr{
    width: 100px;
    display: inline-block;
     vertical-align: top;
    height: 100px;
    overflow: hidden;
    padding: 0px;
    margin: 5px;
    position: relative;
    opacity: 1;
}
Usage | PHP JS
//grab project
$proj =$frunt->getProject("soundcloud-test", "cleanUrl");

//display  media objects
echo $frunt->widget("layout.grid", $proj['media'], array(
    "sort_by" => "type",
    "media_opts" => array(
        "sound" => array(
            "mode" => "modal",
            "modal_group" => "layout-grid"

        ),
        "video" => array(
            "mode" => "modal",
            "modal_group" => "layout-grid"
        ),
        "image" => array(
            "mode" => "modal",
            "modal_group" => "layout-grid"

        )
    )

));
//grab project
proj = frunt.getProject("soundcloud-test", "cleanUrl");

//display  media objects
html = frunt.widget("layout.grid", proj['media'], {
    sort_by : "type",
    media_opts : {
        sound : {
            mode : "modal",
            modal_group : "layout-grid"
        },
        video : {
            mode : "modal",
            modal_group : "layout-grid"
        },
        image : {
            mode : "modal",
            modal_group : "layout-grid"

        }
    }
});

//put it in the dom
$("#container").html(html);

//if this is after page load, make sure to reinit frunt.widgets.js
cmcm.fruntWidget.init();
Output
Frunt / Widgets / List
The List Widget is a quick way for you to display your attributes of projects and media in text. Mainly a text based widget and you can format keys and values of each, ignore certian elements, etc.
Actual widget method structure covered here
simpleList
SimpleList layout (simpleList) accepts a a single media or project Object, below are the available options..
-
template : String,Desired Template for each list item
/ Default : "<span class='key'>{{key}}</span>: <span class='val'>{{val}}</span>", -
default_format : Object containing 'key' and 'value' functions for default formatting..
key and value can have Seperate functions.
- key : Function, Desired default formatting for keys..current replaces underscores with spaces / Default : function(k){return k.replace(/_/gi, " ");}
- value : Function, Desired default formatting for values.. / Default : function(v){return v;}
- custom_format : false or set of Objects containing 'key' and 'value' functions for custom formatting.. / each object key would be name of attribute to apply to. ex. {'title' : {key: func , value : func}, 'year' : {key: func, value: func }} / Default : false
- list_type : What kind of data attributes, 'project' or 'media' / Default : 'project'
-
ignore_default : Object with ignore defaults for both project and media objects..
Each item has an array of ignored attributes.
- project : Array, project attributes ignored / Default :['id','published','added','cleanUrl','coverImage','media']
- media : Array, media attributes ignored.. / Default : ['visible','src','type','thumb']
- showDefaultIgnores : True or False, show attributes on the default ignore list / Default : false
- ignore : False or Array of additional attributes to ignore / Default : false
- only : False or Array of attributes that will only be shown. / Default : false
Usage Example #1 : Description HTML | PHP JS
//convert description value to working html
echo $frunt->widget("simpleList", $frunt->getProject(0), array(
    "custom_format" => array(
        "description" => array(
            //convert description value to html
            "value" => function($v) use ($frunt){
                return $frunt->convert($v,'html');
            }
        )
    )
));
//convert description value to working html
html = frunt.widget("simpleList", frunt.getProject(0), {
    custom_format : {
        description : {
            //convert description value to html
            value : function(v){
                return frunt.convert(v,'html');
            }
        }
    }
});

//put it in the dom
$("#container").html(html);

//if this is after page load, make sure to reinit frunt.widgets.js
cmcm.fruntWidget.init();
Output
Usage Example #2 : Ignore title,description | PHP JS
//ignore some attributes and change template
echo $frunt->widget("simpleList", $frunt->getProject(0), array(
    "template" => "<span class='key'>[{{key}}]</span> <span class='val'>{{val}}</span>",
    "ignore" => array("title","description")
));
//ignore some attributes and change template
html = frunt.widget("simpleList", frunt.getProject(0), {
    template : "<span class='key'>[{{key}}]</span> <span class='val'>{{val}}</span>",
    ignore : ["title","description"]
});

//put it in the dom
$("#container").html(html);
Output
Frunt / Widgets / Modal
The Modal Widget is a lightbox/shadowbox/pop-up enlargement window that can work as a link "frunt-modal". It is used by other widgets, but can be used seperately as well. Supports any media object source (sound,video,image).
Remember to run cmcm.fruntWidget.init() in javascript if modal links are added post-loaded document.
Modal
Link Method
For link-based modal, the link must have the .frunt-modal class. below are available attributes.
- href: Media source (if relative link, make sure to include extra path to CMCM)
- title: Media caption
- rel: Modal group / Default : 'modal'
Usage Example #1 : Modal Link
<a href="cmcm/media/image-005.jpg" class="frunt-modal" title="modal demo" rel="modal demo 1">Modal Demo</a>
Output
Usage Example #2 : Modal Groups
<a href="cmcm/media/Pensive Parakeet.jpg" class="frunt-modal" title="caption!" rel="modal group demo">
    <img src="cmcm/media/thumbnail/Pensive Parakeet.jpg">
</a>
<a href="cmcm/media/Costa Rican Frog.jpg" class="frunt-modal" title="caption!" rel="modal group demo">
    <img src="cmcm/media/thumbnail/Costa%20Rican%20Frog.jpg">
</a>
<a href="cmcm/media/Boston City Flow.jpg" class="frunt-modal" title="caption!" rel="modal group demo">
    <img src="cmcm/media/thumbnail/Boston City Flow.jpg">
</a>
Output


Frunt / Widgets / Responsive
Responsive Widget, frunt-responsive is more of a utility then a widget, used to facilitate intrinsic ratios, cropping (filled) vs. bounding Box (within) situations, and overall scaling of elements when it's dimensions depend on the parent. It uses javascript as a scaling technique, and on document resize is when it will update elements.
Responsive
Used to have elements scale in certian ways, when parent has unknown or relative dimension(s). This utility can be used by adding the .frunt-responsive class to an HTML element and using the following data attributes as options.
- data-ratio : false or String, width x height ratio ..ex.. "[1,5]" or "[9,6]"..if if element is an image, this will inherit those dimensions. / Default : false or [if image] inherited
- data-bias: false or String, bias is used to tell us if we should ignore one dimension of the parent or not, when scaling the element..and then the ratio + the bias will be used to scale. If this method is used, then data-fit, becomes inessential. / Default : false
Possible String values for data-bias attribute.
- [default] : If not specified, both the parent width and height will be used as bounding dimensions. (make sure your parents have dimensions in this case)
- "parent-width" : Parent width will be used, and parent height is ignored. example is when width is a constraint (vertical scroll)
- "parent-height" : Parent height will be used, and parent width is ignored. example is when height is a constraint (horizontal scroll)
- "height" : [rare case] Element height is constraint, and width is ignored. Used when scaling method is not related to parent.
- "width" : [rare case] Element width is constraint, and height is ignored. Used when scaling method is not related to parent.
- data-fit: false or String, how we should fit the element within the parent. / Default : "fill"
Possible String values for data-fit attribute.
- "fill" : Element will fill all of parent constraints, so will likely be cropped and no additional space will be seen.
- "within" : Element will not exceed parent constraints, so additional space may be seen.
- data-sync-parent: false or Int, Should we sync (match) the parent(s) dimensions to this element after dimensions are determined. You can match first parent by specifying 1, or multiple by specifying the number of parents (2, 3, 10!). If there is a parent bias (parent-width, parent-height), then that dimension obviously won't change. This could be useful in certian situations where one or several parent dimensions are irrelevant (scrolling sites). / Default : false
Usage Example #1 : Ratios
Ratios are useful when you want to constrain dimensions as such, instead of dimensions. With images, this is an easy task solved with css, but other elements such as Divs and iframes, its difficult to do. So our ratio technique makes it the same for all! If this box was in a parent that was scaleable it would always retain it's same ratio.
<div class='box' style='height: 300px'>
    <div id='fruntResponsiveRatioExample' class='frunt-responsive' ratio='[7,3]' data-fit='within'>
        <span class='ratioText'>7:3</span>
    </div>
</div>
Output
Usage Example #2 : Fitting "fill" vs. "within"
Fitting is useful when you need to either fill a parent completely (ex. crop, thumbnail, background-look) or use the parent as max constraints (ex. whole image, light box enlarged, no crop). With frunt-responsive you can do either or. In these two examples we'll show the difference. YES, with images you can achieve this with css more or less, but this is to show just a simple example. Also, this full crop (fill) will work with portrait images too, something css would need an additional class for.
<!-- WITHIN OPTION -->
<div class='exampleParent' style='height: 100px; width: 40%;'>
    <img src="cmcm/media/Boston City Flow.jpg" class='frunt-responsive' data-fit='within' >
</div>
<!-- FILL OPTION -->
<div class='exampleParent' style='height: 100px; width: 40%;'>
    <img src="cmcm/media/Boston City Flow.jpg" class='frunt-responsive' data-fit='fill' >
</div>
Output
Usage Example #3 : Data Biases and parent sync
Check out the horizontal and vertical scroller layout examples. They're perfect to show a situation needing a parent dimension bias, and syncing.